Project Management
Project management refers to the branch of management dedicated to planning, modelling, coding and deployment during the software development lifecycle. It is a very important part of any project, no matter the size or number of developers in the team, as it allows the team to track the status of the project, being able to view a backlog of tasks, see which tasks are currently being worked on, which tasks need reviewing and which tasks have been completed.
The project lead should be the one to set up the initial management tools (more on this later), as well as schedule and outline the workflows to the other developers during the planning phase. The following are some tasks a project lead/manager might have to complete [1]:
- Planning: This means putting together the blueprint for the entire project. It will define the scope, allocate necessary resources, propose the timeline, lay out a communication strategy, and indicate the steps necessary for testing and maintenance.
- Leading: A software project manager will need to assemble and lead the project team
- Execution: The project manager will participate in and supervise the successful execution of each stage of the project. This includes monitoring progress through frequent team check-ins or SCRUM meetings
- Time management: Staying on schedule is crucial to the successful completion of any project, but it’s particularly challenging when it comes to managing software projects because changes to the original plan are almost certain to occur as the project evolves
- Budget: Like traditional project managers, software project managers are tasked with creating a budget for a project, and then sticking to it as closely as possible, moderating spend and re-allocating funds when necessary. This one will be less applicable to you whilst at University.
- Maintenance: The project manager is responsible for ensuring proper and consistent testing, evaluation and fixes are being made.
Why is it important
Here are some reasons why project management is so important and why you should have knowledge of it at Level 4, be doing it at Level 5 and 6, and will be expected to follow it after you graduate [2]:
- Defines a plan
- Establishes a schedule
- Enforces and encourages teamwork
- Maximises resources
- Manages change
What is Expected?
At Level 4, it is not essential to use a project management tool as it is likely you will mostly be working on your own projects as an individual. However, it is a useful concept to get a grasp of early, and using a tool would be a nice touch to your projects.
At Level 5 and beyond, we would encourage you to use Agile Project Management and associated tools. Agile is a project management methodology that uses short development cycles called “sprints” to focus on continuous improvement in the development of a product or service. Software development methods go back as far as 1957, although agile was first discussed in depth in the 1970’s. In 2001, the Agile Manifesto was created, highlighting four key values and twelve principles to guide developers.
At level 6, risk will be considered and you’ll look at mananging dependencies.
Agile Project Management
Agile is a project management methodology that uses short development cycles called “sprints” to focus on continuous improvement in the development of a product or service. Software development methods go back as far as 1957, although agile was first discussed in depth in the 1970’s. In 2001, the Agile Manifesto was created, highlighting four key values and twelve principles to guide developers.
These 12 key principles are:
- Customer satisfaction is always the highest priority and is achieved through rapid and continuous delivery.
- Changing environments are embraced at any stage of the process to provide the customer with a competitive advantage.
- A product or service is delivered with higher frequency.
- Stakeholders and developers collaborate closely on a daily basis.
- All stakeholders and team members remain motivated for optimal project outcomes, while teams are provided with all the necessary tools and support, and are trusted to accomplish project goals.
- Face-to-face meetings are deemed the most efficient and effective format for project success.
- A final working product is the ultimate measure of success.
- Sustainable development is accomplished through agile processes whereby development teams and stakeholders are able to maintain a constant and ongoing pace.
- Agility is enhanced through a continuous focus on technical excellence and proper design.
- Simplicity is an essential element.
- Self-organizing teams are most likely to develop the best architectures and designs and to meet requirements.
- Regular intervals are used by teams to improve efficiency through fine-tuning behaviors.
Although it was originally designed for the software industry, it is now becoming more and more popular in many other industries due to its highly collaborative and efficient nature. It is likely many of the companies you will be applying for after graduation and for placements will use some form of the Agile methodology.
Benefits of Agile for Project Management
- More rapid deployment of solutions
- Reduced waste through minimization of resources
- Increased flexibility and adaptability to change
- Increased success through more focused efforts
- Faster turnaround times
- Faster detection of issues and defects
- Optimized development processes
- A lighter weight framework
- Optimal project control
- Increased focus on specific customer needs
- Increased frequency of collaboration and feedback
These are based from reference [1].
Agile Methodologies
Agile is an umbrella term for a number of different methodologies. Many of these methodologies will be useful to you as Level 5 students. The most widely used Agile Methodologies are:
- Agile Scrum Methodology
- Lean Software Development
- Kanban
- Extreme Programming (XP)
- Crystal
- Dynamic Systems Development Method (DSDM)
- Feature Driven Development (FDD)
These are based from reference [2]. If you would like to know more about these methodologies, follow the link for reference 2 at the end of this document.
For your group assignments and work with clients, we encourage you to adopt one of more of these methodologies, we especially enourage you to use Scrum and Kanban for team communication and project management respectively. Using these two together can greatly increase the projects chance of success (more on Scrum on the Team Communication guidelines).
Biggest Risks in Software Development
Software development is often difficult to predict and plan. It is often intangible, and involves a large number of stakeholders. These factors can create a number of risks that you will need to manage on your projects. The following are 5 of the biggest risks in software development, both internal and external:
- Inaccurate Estimations (deadlines, budget, iteration etc)
- Scope Variations
- Stakeholder Expectations
- Poor Quality Code (difficult to read or review, poorly tested)
- Inadequate Risk Management
These are based from reference [1]. There are many more potential risks however these are likely to be some of the most common to you as Level 6 students. To be aware of further risks, check out reference [1] at the bottom of this document. Pay close attention to number 5. Most, if not all of these can be mitigated with proper risk management.
Scrum
What Is Scrum
Scrum is an Agile, lightweight communication framework designed not only for use in software development, but many other industries as well. It consists of a Scrum team, made up of a team of developers in this case, as well as a dedicated Scrum Master (also usually a developer) and a Product Owner. It is designed to allow for quick adaptation to problems that arise during development, such as changes to scope. This is how it works:
- A Product Owner orders the work for a complex problem into a Product Backlog.
- The Scrum Team turns a selection of the work into an Increment of value during a Sprint.
- The Scrum Team and its stakeholders inspect the results and adjust for the next Sprint.
- Repeat
How To Use Scrum
Scrum can be a very effective framework if used correctly, and in conjunction with other Agile methodologies. A diagram of a typical Scrum Sprint can be seen here:
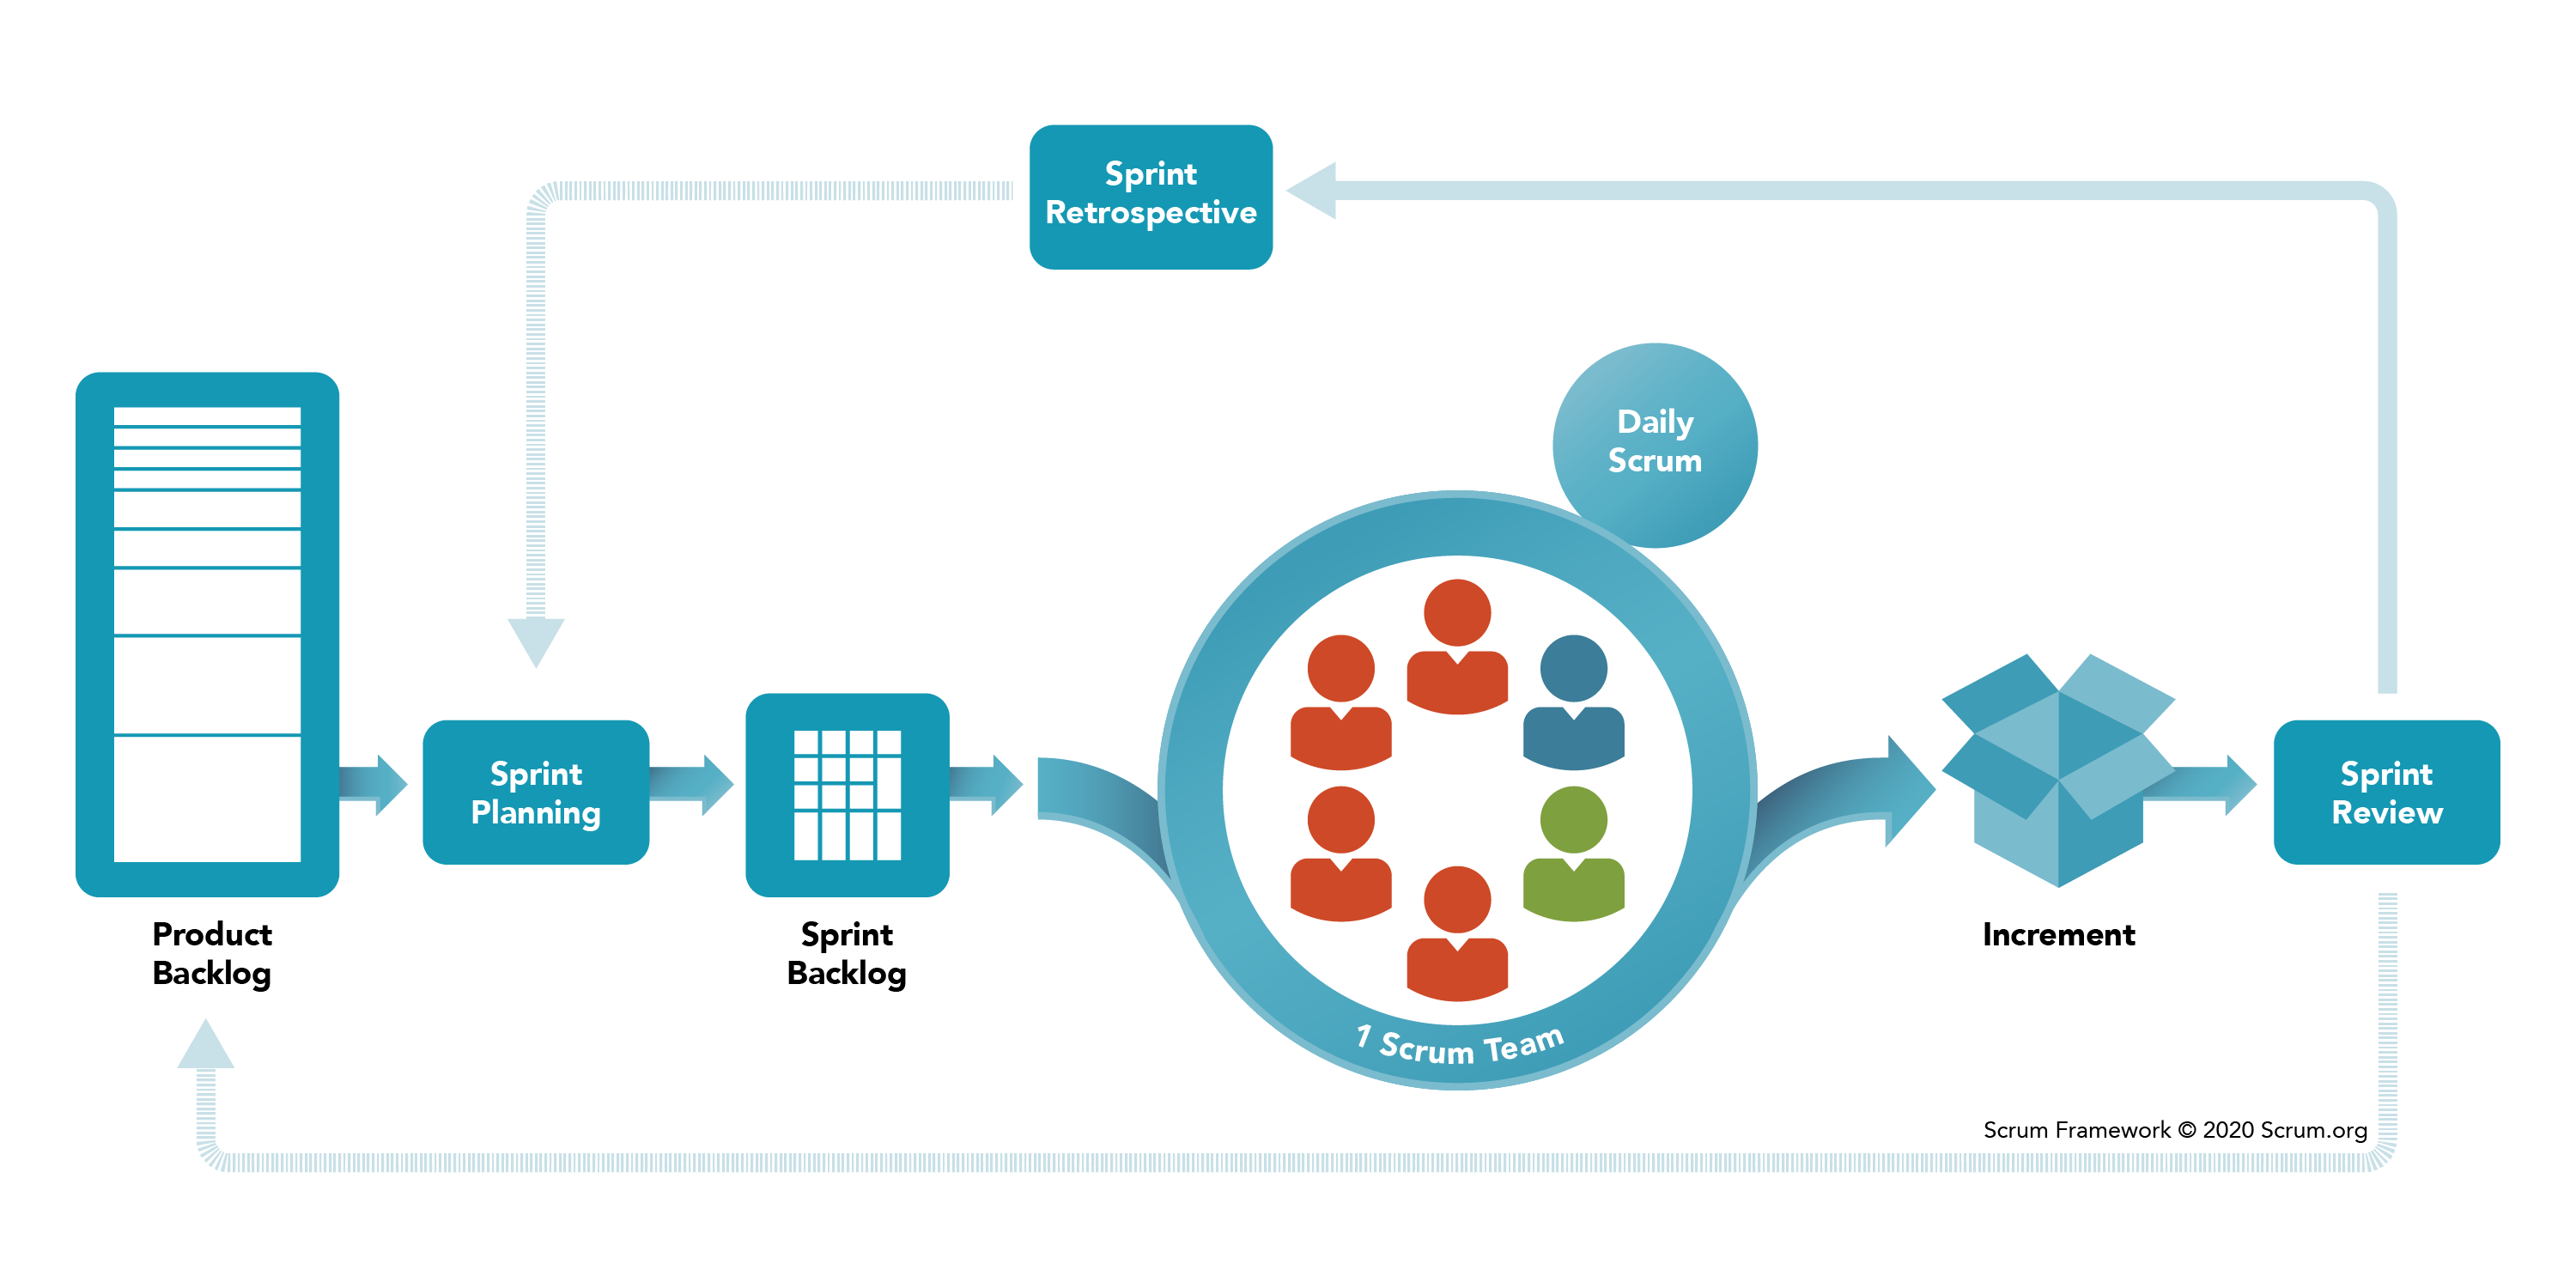 Fig. 1: The structure of the Scrum framework. By Scrum.org.
This diagram shows the elements involved in a Scrum Sprint. The product backlog is a backlog of all the tasks that need to be completed for a project. This is usually created on a Kanban board for better project management, and is usually organised by the team lead/Product Owner, based on their priority using the MoSCoW Method. Sprint Planning should typically consist of a Scrum meeting at the start of each working day, where the each of the team answer 3 fundamental questions:
- What did I do yesterday?
- What am I going to do today?
- Are there any barriers that might hinder my progress?
After the meeting, a sprint backlog is created, which consists of a backlog of the tasks identified from the “What am I going to do today?” answers. At this point, the daily Scrum can begin, where developers each take a task from the sprint backlog and work on them until completion, Incrementing them each time a task is complete. This is repeated until the end of the sprint, which can typically last from just a few days, up to a month at most for some larger implimentations.
At the end of a sprint, there should be a sprint review where the team discuss the outcomes of the sprint, what went well? What didn’t go as well? How could we improve for the next sprint? (Sprint retrospective) This evaluation is typically shared to the key stakeholders of the project. After this point, the product backlog is updated and the next Scrum plan can begin. Follow this structure until the completion of the project. This is based from reference [1].
Why Is Scrum Useful?
Scrum is very effective when combined with other Agile methodologies such as Kanban which you should also be using for your project management. This is commonly known as Scrumban. As an individual component, Scrum brings many benefits including:
- Quicker release of useable product to users and customers
- Higher quality
- Higher productivity
- Lower costs
- Greater ability to incorporate changes as they occur
- Better employee morale (as you do not have a ‘Boss’ in a Scrum team)
- Better user satisfaction
- Being able to complete complex projects that previously could not be done
These are based from reference [2]. As well as these, team communication is improved, as each developer will know what each other is working on, and what problems they might face.

How To Manage Risks
In order to manage the risks highlighted above, first, you’ve got to identify and plan. Then be ready to act when a risk arises, drawing upon the experience and knowledge of the entire team to minimize the impact to the project. You can manage these risks by partaking in the following tasks:
- Identify risks and their triggers
- Classify and prioritize all risks
- Craft a plan that links each risk to a mitigation
- Monitor for risk triggers during the project
- Implement the mitigating action if any risk materializes
- Communicate risk status throughout project
These are based from reference [2].
Communication is the best way to mitigate internal risks, such as inaccurate estimations, stakeholder expectations and scope variations. Poor code quality can also be mitigated with communication, if you identify any potential lack of experience in a particular area early, such as code commenting, then you can work on improving that area.
It is important to always be aware and monitor all aspects of the project to catch any risks early, so you can then impliment the mitigating action before the risk develops even bigger. We also expect you to be using a tool at this level, to track all of your projects. You can find information on what tools we recommend, along with some walkthrough examples under Project Management.
Dependencies
You will often find on projects that many tasks can be dependent on the completion of another. This can be very frustrating if you are waiting on another developer to finish their work on another task so you can start yours. Following are a list of dependencies you may encounter on the software development lifecycle:
- Technology Dependency: Dependencies arising from architecture, design, coding, components etc (e.g. Program A cannot function until Program B is developed)
- Data Dependency: Dependencies related to data readiness to complete project tasks (e.g. Acceptance Tests cannot start until we get adequate data for testing)
- Application/Service Dependency: Dependencies involved in developing, maintaining or testing your current application with reference to other related or dependent modules, applications or services
- Build Dependency: Dependencies relating to compiling programs in the right order, often comes under Technology Dependency
- Operational Dependency: Operational dependencies such as release dependencies, data migration dependencies, connectivity dependencies
These are based from reference [3]. Technology Dependencies will be the most common to you as L6 students.
How to Manage Dependencies
Dependencies can often be very difficult to manage, but there are some general strategies you can follow:
- Prioritise your tasks and dependencies (if a number of tasks depend on another, work on that task first)
- Use a tool to track your project (e.g. Trello), becoming aware of dependencies early
- Establish policies early to avoid headache later by employing proper time management
- Use automation where possible to save time and reduce exposure
- Communicate with your team at all times
Some of these are based from reference [4]. The most important strategy is to communicate at all times, use a tool to identify dependencies early, and prioritise them appropriately.
Tools
The tools below are just a couple you can consider:
- Trello
- MS Project
- Github Projects
- Creating your own Kanban style board using post-it notes/paper/whiteboard
- PlanitPoker
Trello
Trello is a free, and very versatile project management tool, and is the tool that I would retend to students of all levels. It is a Kanban board (Agile development) allowing users to track the status of their projects. The concepts behind Agile development are highlighted above, along with details on how to properly manage your projects.
Setting Up The Board
I will now walkthrough an example of how to set up Trello for project management, you should follow a similar structure to the example in your own projects:
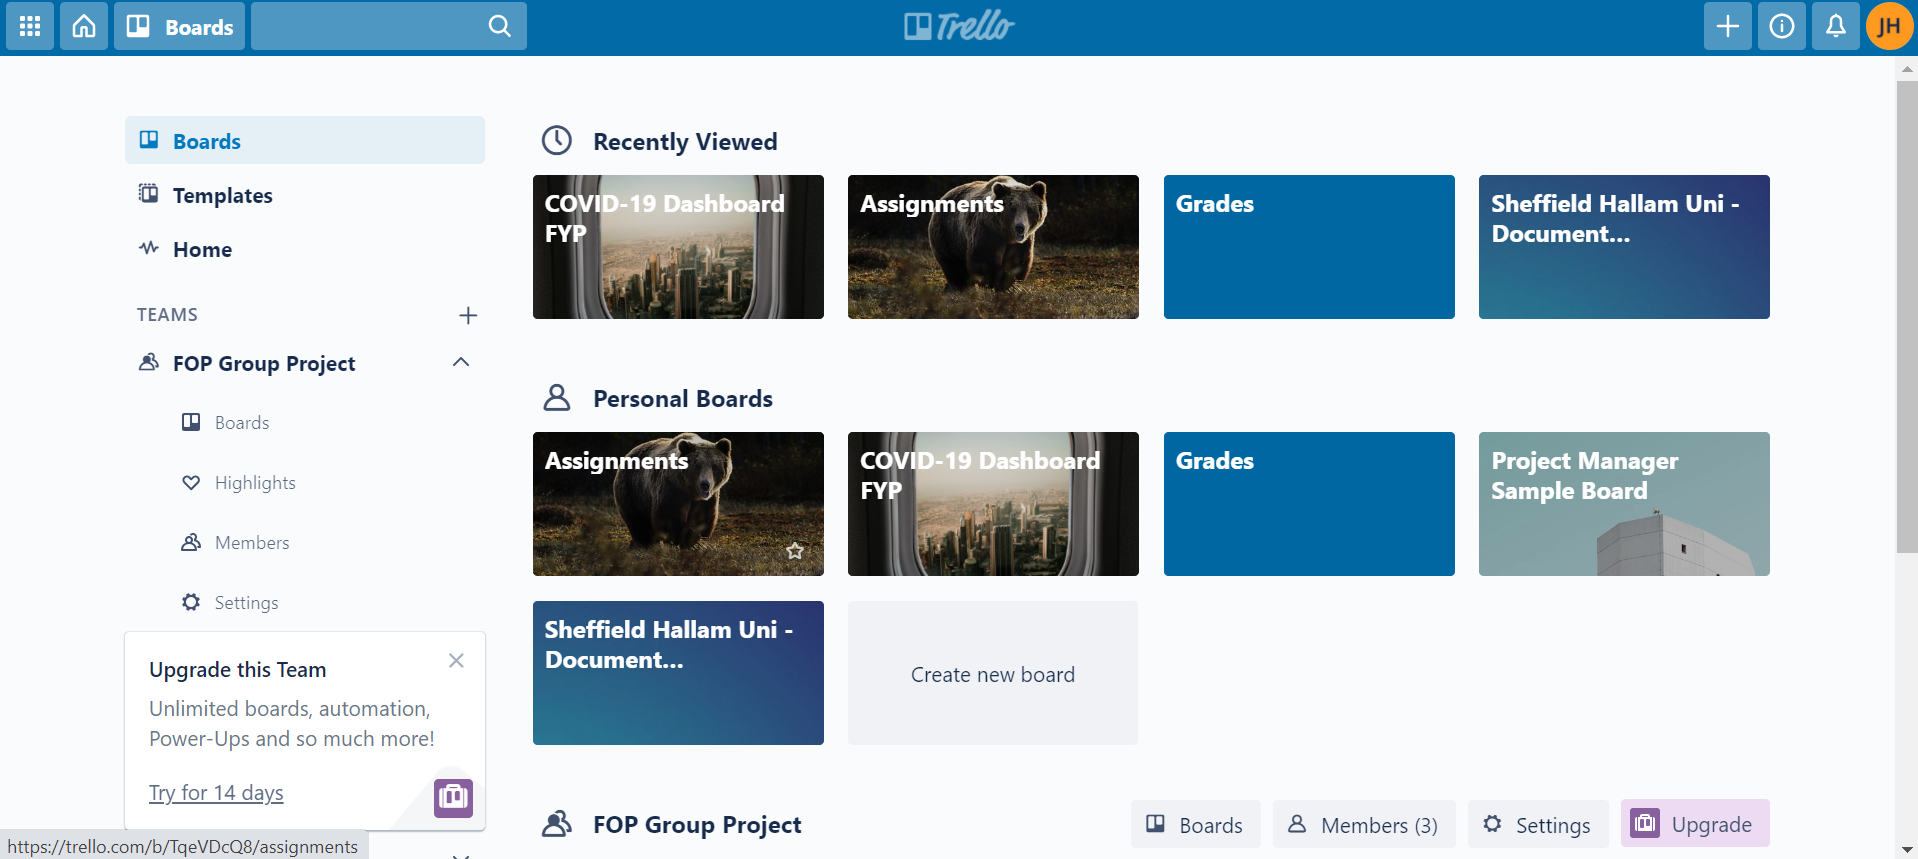
1 - Go to https://trello.com/en and create an account 2 - If you navigate to Boards, you should see a screen similar to this (my Trello has a few boards already set up):
3 - Click Create a new board or click the + button in the top right corner of the screen and then Create board 4 - Fill in the fields with appropriate information and click Create Board. You should see something similar to this:
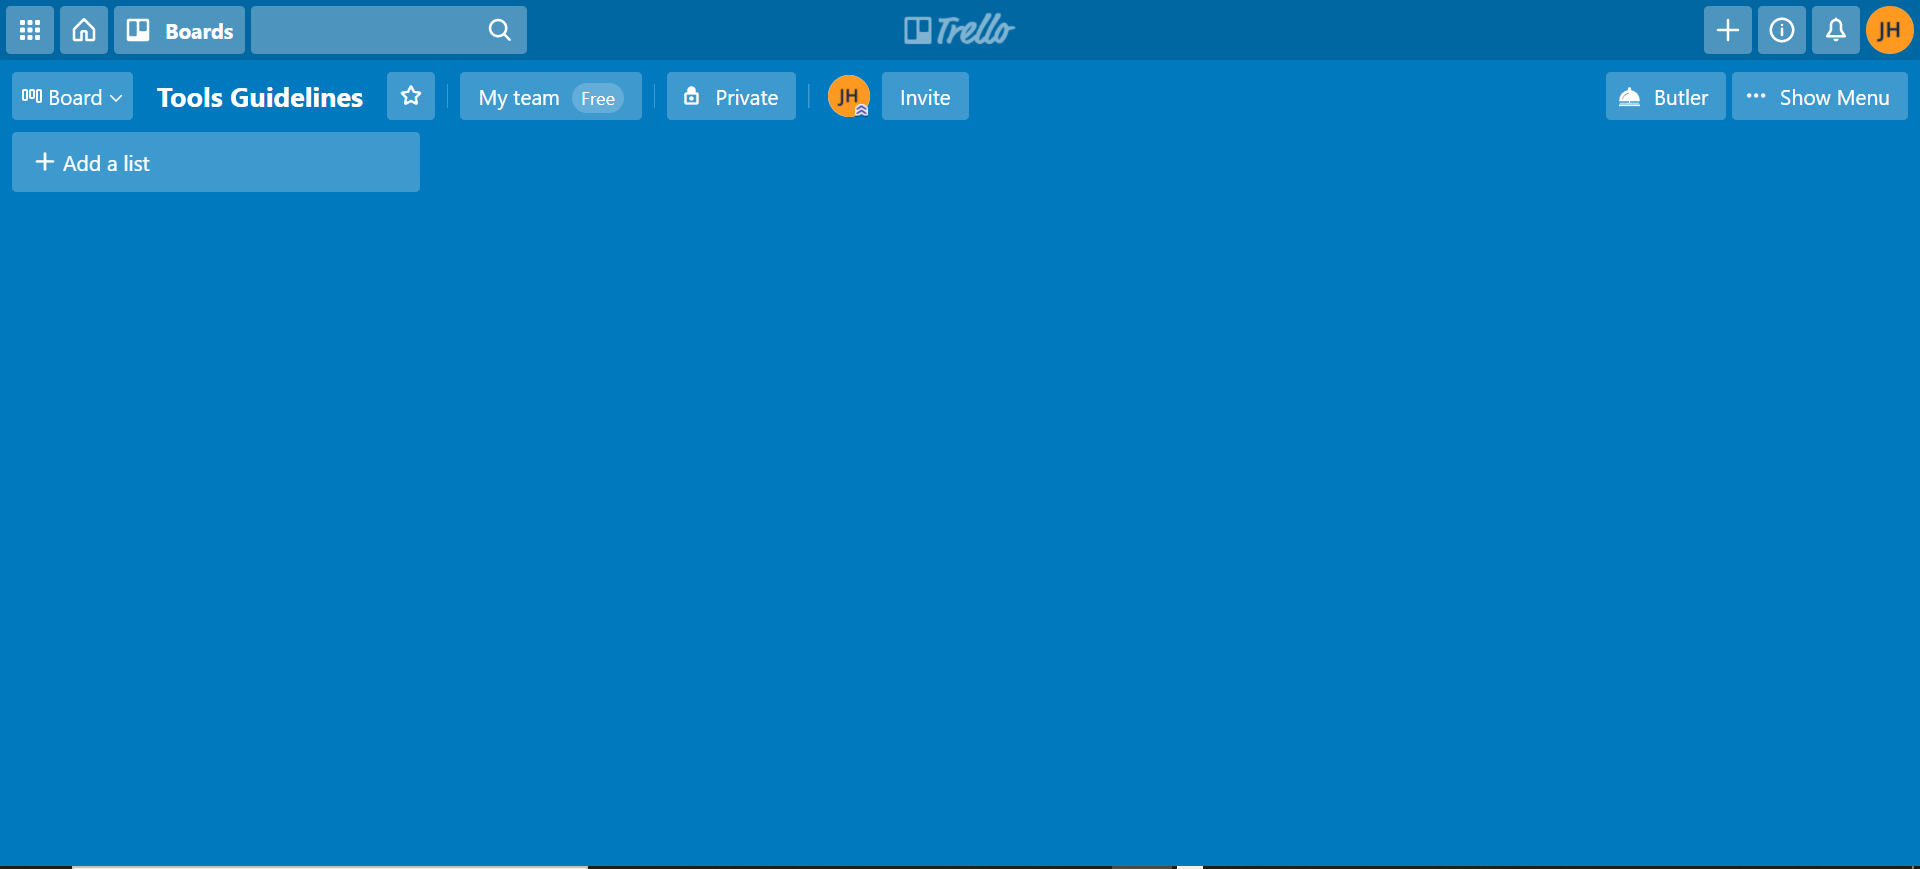
5 - We will now set up our lists. Click Add a list and set the title to To Do then press Enter or click Add list 6 - Repeat step 5 but set the titles of the lists to Doing, Needs Review and Done along with any other lists you deem appropriate. You should now have something that looks like this:

Adding Members
Follow these steps to add your team members to the board so that they can see and make changes:
- In the centre at the top of the screen you should see Invite, click this.
- You now have 2 options, you can manually search for your team members’ email addresses/names and add them in, or you can click Create Link to send them a link to the board
- If you search for members’ names, they should recieve an email inviting them to the board. Their icons should appear next to your own next to the Invite button.
- You may wish to change the privacy of the board, to allow only members of the team to view it. To do this, simply click the change visibility button to the left of your icon. You can also change teams by clicking the button to the left of that.
Making Changes
You can make changes to the visual appearance of the board and view the boards’ activity by clicking the Show Menu button to the right of the screen. Feel free to navigate this menu in your own time.
Adding Tasks
The process of adding tasks is similar to that of creating a list:
- Navigate to the To Do list and click Add a card
- Fill in the field with the task you wish to add
- Click the ellipsis to the right of the card to add members and labels (you can also do this later)
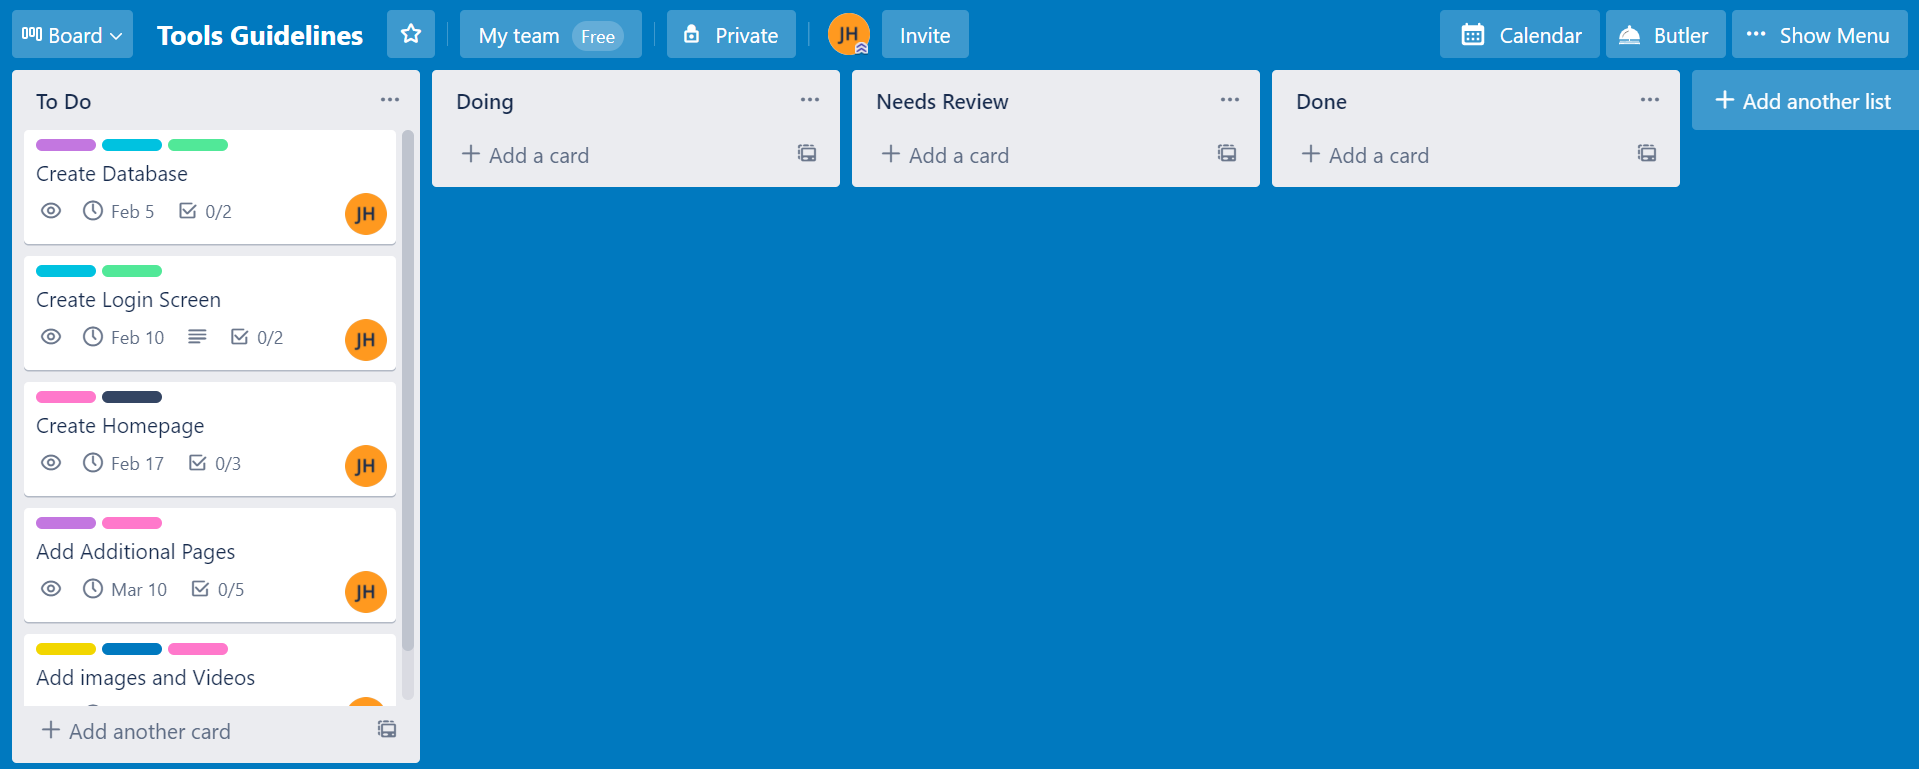
- Once the card has been added, you can click on it to apply more features, such as labels, add members, create a checklist and add a due date. We recommend you do all of these to make for clear, structured project management. Remembering to update the checklist and keep an eye on the due date
- Repeat this for all tasks that you have identified from your User Stories/Requirements Specification. After you have done this, you should have something similar to this:
Management Process
Once your board is set up, you are ready to start on your project! (if at development stage). You must now manage your project using Trello. This is explained in greater detail in the level specific guidelines. You can move your cards (tasks) to the different lists depending on their status. If they are being worked on, move to Doing, if they need to be reviewed, Needs Review etc. Remembering to update the checklist as you are working on them.
If you have been doing this correctly throughout development, your board should look something like this:
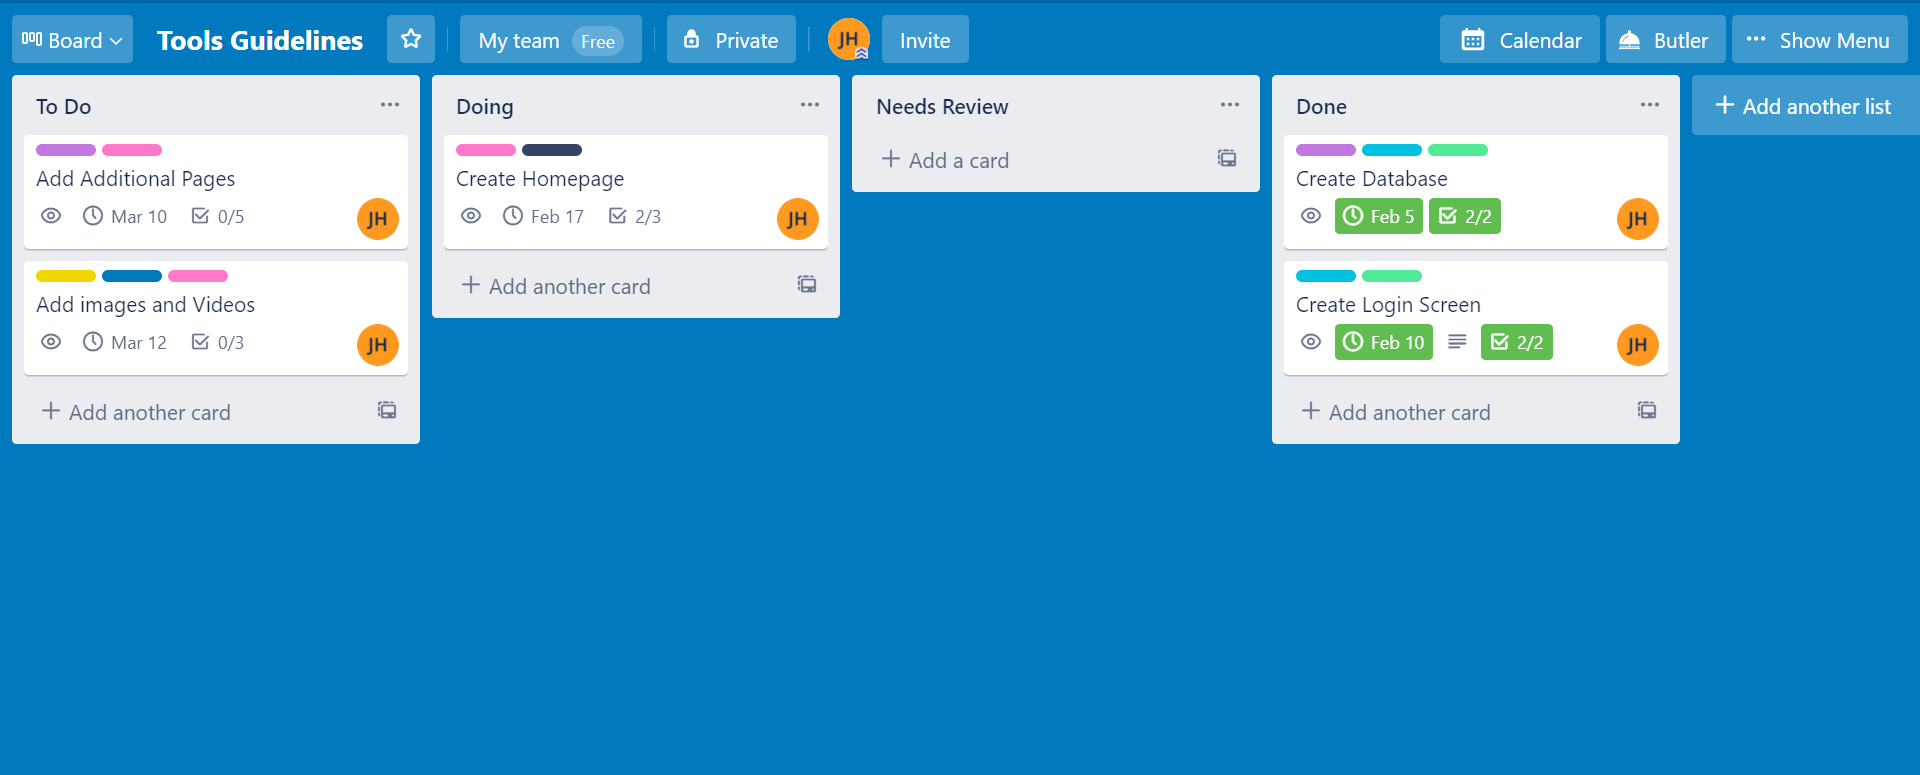
Keep working and updating your board with your progress, until eventually, all tasks are under the Done list, with their checklists complete and due dates marked complete.
Github Projects
Not only can Github be used for version control, it can also be used effectively as a project management tool. You can do this through Github Projects within your repository (which you should set up for every project). It works in a similar way to Trello, in the sense that it is a Kanban board, however, as this board is integrated with Github, it can be used in conjunction with issues and milestones which are explained in detail in the version control guidelines, therefore I will not be explaining them here.
I will now walkthrough how to set up Github Projects for your own projects in your repositories. It is similar to the setup for Trello.
Setting Up The Board
1 - Navigate to your repository and click Projects on the navigation bar at the top 2 - On the right, you should see a green button that says Create a project, clisk it and fill in the fields 3 - At the bottom, you should see a Template option, this will save you time by creating the lists for you. We recommend you select:
- Basic kanban for Level 4
- Automated kanban with reviews for Levels 5 and 6
4 - Click Create project when you are satisfied. You should see something similar to this, you can add cards such as Done if you wish:

Adding Tasks
Adding tasks/cards to Github Projects is a little different to Trello. Tasks are added in the form of Issues. In short, navigate to Issues in your repository, and create an issue. You can read more about it under Version Control.
When you create an issue, you can assign it to a project. If you already have a project created like in this example, it should appear in the issue as seen here:
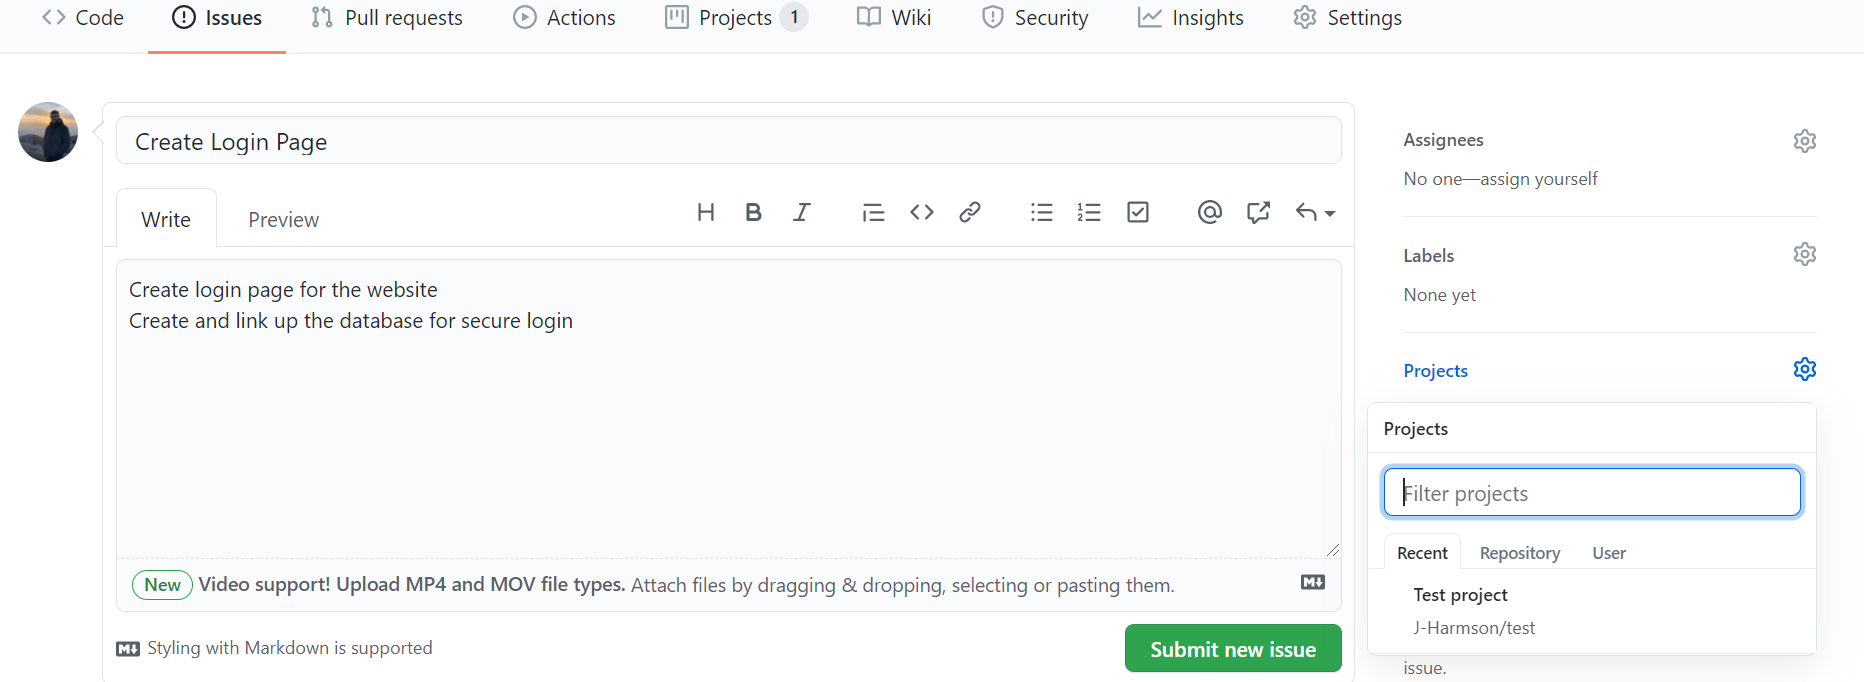
Once the issue has been created, you should see that it has been added to the project under the To Do list via automation. This issue is now a card in the project, if you navigate back to your project, you can click the issue to see information, and click Go to issue for full details if you need to navigate back to the issue page. If you have done all of this correctly, you should see something like this:

Repeat this with all of your issues, and new issues when they are created. In a similar way to Trello, you should drag and move your cards/issues between the lists in your project to track their status. Your board should look something similar to the board in 3.5. Management Process.
Other Software Available
If you want to use software other than those shown above, there are other software available such as:
MS Project (paid service but can be used for free on university machines)
- How to use: https://support.microsoft.com/en-us/office/basic-tasks-in-project-8fdbf020-a9e1-45e4-bf15-23a8d2b6797d
MS Excel
Basecamp (free for students)
-
Download/link: https://basecamp.com/
-
How to use: https://basecamp.com/learn
Wrike
-
Download/link: https://www.wrike.com/
-
How to use: https://help.wrike.com/hc/en-us/categories/201188625-Wrike-Videos?type=videos&category=for-admins
References
[1] Wrike. What Is Software Project Management? - https://www.wrike.com/project-management-guide/faq/what-is-software-project-management/
[2] 2020 Project Management. 10 Reasons why Project Management matters. - https://2020projectmanagement.com/resources/general-interest-and-miscellaneous/10-reasons-why-project-management-matters