Version Control
ℹ️Summary
Version control helps developers track projects and all files/folders/source code in one place. It is useful for both teams of developers and individual work.
This document will serve to provide you with instructions on how to use Git and Github as version control for your projects. Version control allows developers to keep track of their projects and have all files/folders/source code all in one place. It is particularly useful for teams of developers but is also useful for individual work.
Once you’re set up, learn about using Git in your IDE.
What is expected?
- At level 4, you only need a git account and to be able to pull & push from a remote repository. See ‘The Basics’ below.
- At level 5, branching strategies and pull requests are introduced in addtion to pull/push.
- At level 6, you’re expected to be familiar with git, branching, and pull requests. Now you can begin using Issues, Milestones, and Projects to manage your codebase.
The Basics
Creating an Account
In order to first start using Github, you will first need to create free Github account:
- Go to https://github.com.
- On the starting page, click Sign up for GitHub:

- Fill out all fields and complete the puzzle, then press Create account
- Use these details when logging in after this point
Repositories
A repository is often used to organise a single project. Often called a Repo, repositories can contain anything that your project could need:
- Folders and files including source code
- Images and videos
- Spreadsheets
- Datasets
- Any other documents you need for your project
Creating a Repository
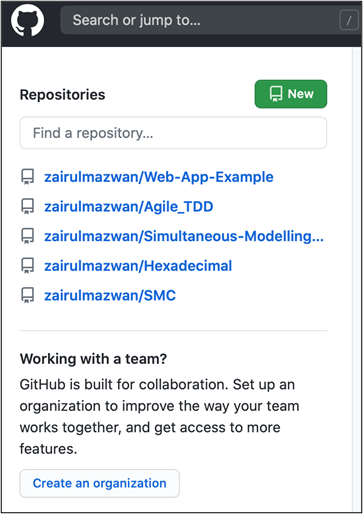
There are 3 ways to create a repository:
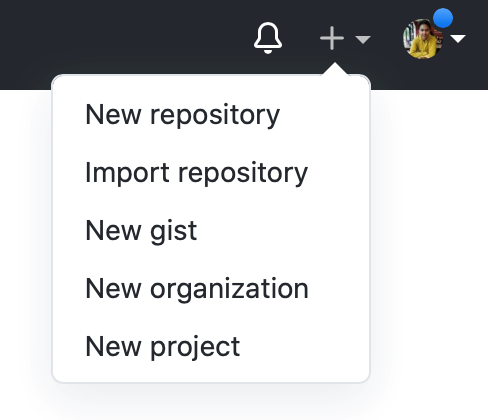
- In the upper right corner, next to your avatar or identicon, click and then select New repository:
- On the panel on the left:
- On the start page/page content:
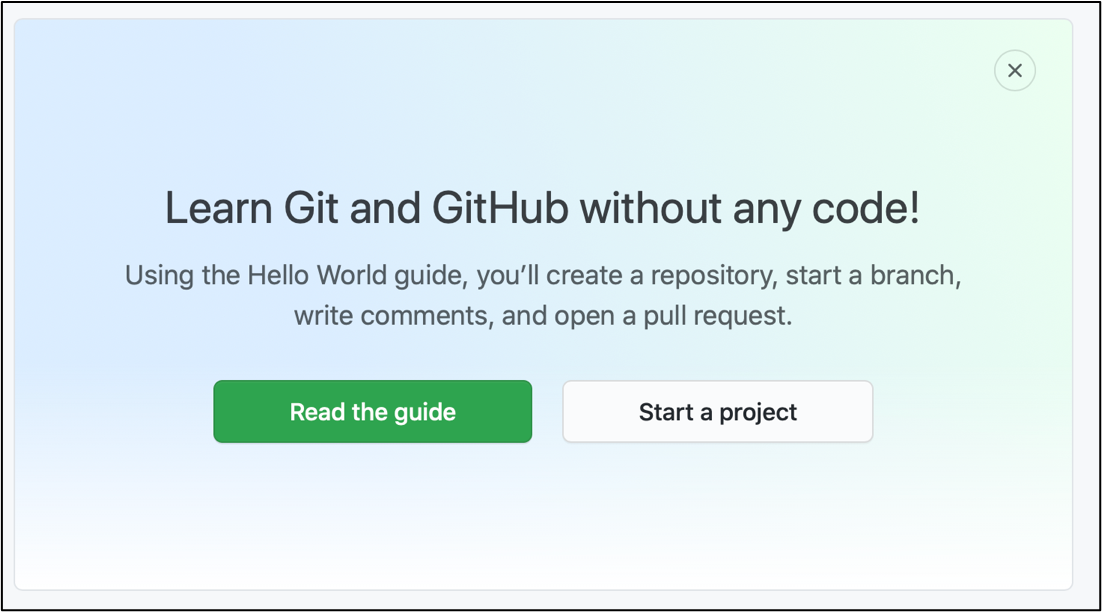
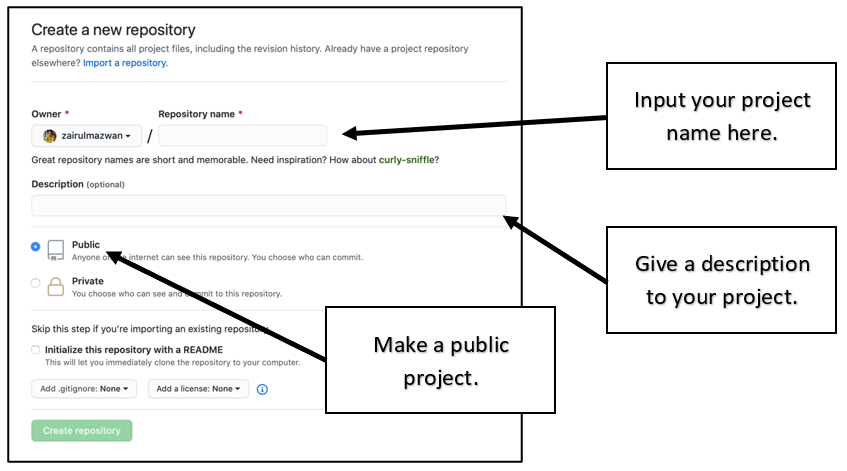
Do any of these and you should see this screen:
Now:
- Name your repository
- Write a short description
- Select Initialize this repository with a README
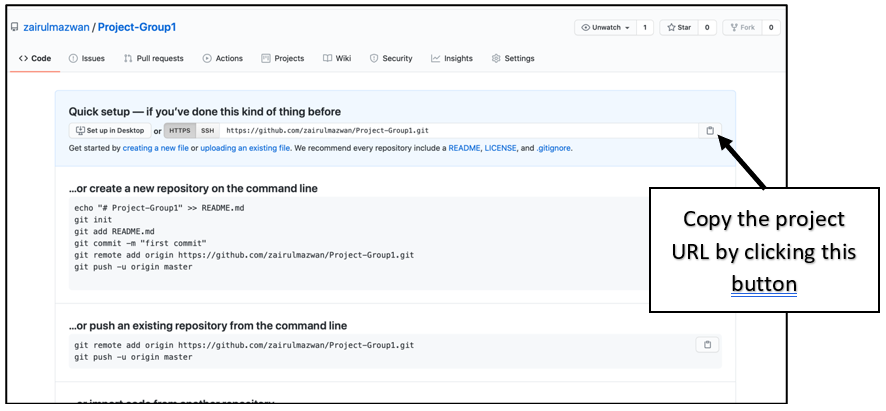
- Click Create repository when you are satisfied. You should be greeted by this screen:
README File
When you first create a repository a README.md file is created. This is simply a text file where you can write a description of you project or any other information relating to your project. This is often written in Markdown which is similar to HTML with its use of header tags which can be done using the # key. It is encouraged to edit your README file to begin with, especially if you are showing the project or repository to others.
Adding Files and Folders
You are now ready to start your project! Once you have created your project (and perhaps made some progress), you will want to upload all the folders and files required to run your project on other machines. Follow these instructions to add in the files for your project:
- Select the repository you would like the files uploaded to;
- Click Add file;
- Click Upload file;
- Go to the directory of your project in your file structure, and drag in your project folder, or click Choose your files and select the files you want to upload;
- Your files should now be added, scroll down to the bottom to Commit changes;
- Add in a description of your changes where it says Add files via upload, this will be the default message if you chose not to change it;
- Leave Commit directly to master branch clicked (more on branching at Level 5);
- Click Commit changes.
Editing and Committing Changes
As well as uploading files, you can also edit the content of existing files inside of a Github repository. You can edit text files such as README’s, as well as source code. The following instructions will guide you on how to edit source code and commit the changes in Github, without the need to use a code editor or IDE. You MUST remember to pull the changes to the files you change if you wish to continue editing the code in your code editor (more on this later):
- Open your repository and the file you wish to edit;
- Click the pencil icon to edit the content;
- Make the changes you wish to make;
- Scroll down to the bottom to Commit changes;
- Add in a small description of what you changed;
- Click Commit changes. Your file will now be updated and the time of the commit logged.
Push and Pull
Pushing and Pulling are used to upload and retrieve code from Github, usually directly through the code editor terminal, GitKraken/Github Desktop or your development environment. ‘Push’ is used to push the changes you have made to your code in the editor onto Github without needing to reupload the full file.
‘Pull’ is the opposite, it is used to retrieve code from Github using the terminal, GitKraken/Github Desktop or your development environment, in order to update your code in your editor. This is used to ensure you always have the most up to date version of your code (very useful for collaboration).
Downloading and Cloning
If you are not using GitKraken, there are two options available to you to retrieve your files and code from Github. The simplest being to download the project as a ZIP folder:
- Navigate to your repository;
- Click the green Code button just above your file structure;
- Click Download ZIP. Your project will then download and you will be free to use it as you please;
Cloning is another way to retrieve your files from Github, this is done through your IDE and avoids the need to download the files each time. In the Git IDE guiance guidance, we have showed an example with screenshots of how to do this:
- Launch your IDE (Visual Studio 2019);
- Navigate to the section where you create or open a project (on the right in VS 2019), there should be a section saying Clone or check out code;
- Click Clone or check out code it should now ask for a Git repository URL;
- Navigate to your required repository in Github;
- Click the green Code button just above your file structure;
- You should see a URL under HTTPS, copy this;
- Paste the URL into the box from step 3;
- Click Clone, the project will now appear in the IDE and you can edit it as you please;
Workflows
You will need to follow a workflow, essentially a strategy you will adopt to work on your project. There are many different workflows you can use, although the best workflow will often be the one you and your team find the most useful, which you may find you create yourselves.
Simple Push/Pull
For level 4, we recommend you follow a basic flow for your projects, using just the one branch, Main/Master, as you are likely to be working as an individual on most of your projects. You should try to use Github for all of your projects, even if it is just you working on them as they can be used to build a portfolio of work to bring to interviews after graduation or for placements.
The main branch should always ready to run with the most up to date version of your code, using tags to identify the release version. This workflow is very basic but will ensure a simple, structure for your project with a clear history of your release versions at Level 4. This workflow is most suitable for small projects, once you start to work on larger projects, you will need to build on this workflow (more on this at Level 5 and 6).
If you have any problems with this, check out reference [1] at the bottom of the document.
Feature Branches
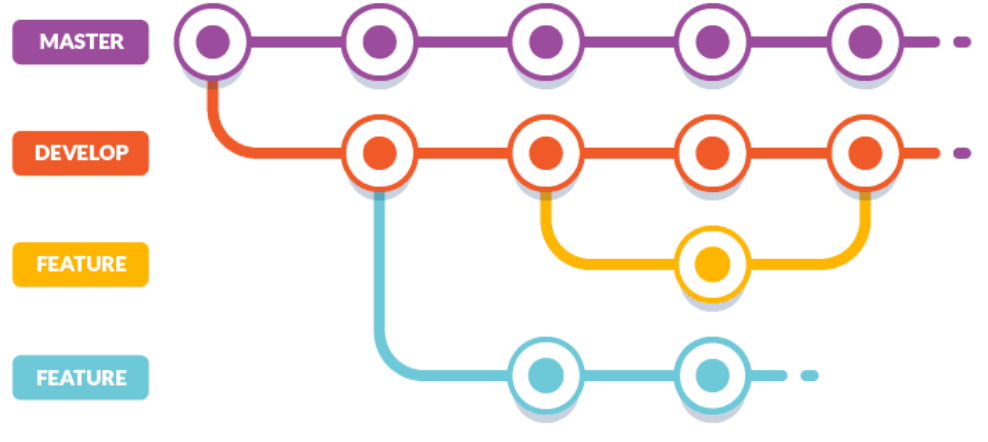
As with Level 4, it is also important to employ a good workflow at Level 5 & 6. At these levels, we expect you to have more experience with Git, and therefore can build on the workflow from level 4, to make it more appropriate for use with teams of developers. The following image shows an example you can follow at level 5 & 6, known as Gitflow. Again, you are free to adapt this workflow to your needs as you see fit:
Fig. 1: Structure for gitflow. Image from Buddy Works.
This structure is based on reference [2].
The structure in Fig. 1 shows a type of workflow known as Gitflow. It is a more advanced version of the basic flow we saw at Level 4, which features two, long-running parallel branches, main/master and development. Again, master is always ready to run with the latest version of the code (which should be tagged), which has been tested thoroughly.
At level 5, everyone should work on the development branch, with feature branches being added and worked on by each developer. Merge requests should be made when you are wanting to merge with the development branch. On this branch, thorough testing and code reviews of the implimented features should be done before merging with the main branch. If the new features pass all tests, it can be merged with the main branch, with the release version being updated.
At level 6, developers should work off the development branch, pushing code changes onto feature branches, and then opening a merge request for code review (more on this strategy later). Once the code has been reviewed and merged with development, you should then test the code thoroughly before merging with the main branch. A full merging strategy should also be employed at this stage, the guidelines for this will be explained in the next section.
If you follow this guidance, you will have a clear structure to your repository. There should be no mistakes on the main branch due to the testing and code reviews occurring on the development branch, and if all developers clone the development branch and push code onto feature branches, everyone can work independently, then open merge requests for review to merge with development.
Branching
Branching is a very important concept in version control, it allows you to work on different versions of the repository at a time, and allows the leader of the project to review changes a developer has made before committing them to the main branch. This is important as the changes may not be correct or may have unintentionally removed another developers’ code. Creating a branch will ensure the main branch, where the most up to date code will be stored, will not be changed without review from the project lead.
Creating a Branch
The following instructions will walkthrough how to create a branch on your repository:
- Go to your repository;
- Click the drop down at the top of the file list that says master;
- Type a branch name (readme-edits for example), into the new branch text box;
- Select the blue Create branch box or hit “Enter” on your keyboard.
If you have followed this correctly, a new branch should be created. You can now make changes to this branch without changing the main branch (commit a change to the readme now so that we can walkthrough pull requests).
Pull Requests
Pull requests are vitally important for collaborative work and go hand in hand with branching. When you open one, you are proposing the changes you have made on a branch and requesting that someone review and pull your changes, merging them with the main branch. The pull request will show differences to whatever is in the main branch, with additions shown in green and subtractions shown in red.
Opening a Pull Request
I will now walkthrough how to open a pull request. As the repository in this example is individual work, I will be the one to review the changes, in a team, this will be done by the project lead or another developer:
- Go to your repository;
- Click the Pull Request tab and then click the green New pull request button;
- Select the branch you made edits on, in this case, readme-edits, to compare with the main branch;
- Look over the changes, make sure they are what you want to submit;
- Click Create Pull Request when you are satisfied;
- Give the request a title and brief description and click Create pull request!.
Merging
I will now walkthrough how to merge the pull request you made, as previously mentioned, this would usually be done by the project lead or another developer. This will merge your changes in readme-edits with the main branch:
- Go to your repository;
- Click the Pull Request tab, you should see the pull request you submitted earlier, click it;
- Look over the changes by clicking the Commits tab and selecting the request;
- Once you are satisfied, click the green Merge pull request button;
- Click Confirm merge;
- If you wish, you can delete the branch you made the changes to by clicking the Delete branch button.
If you have done all of this correctly, your changed readme should appear in the master branch. Sections 4-6 are based off of reference [1].
Issues
Issues are great for collaborative work. They are essentially tasks which need to be completed for the project, you can assign yourself or developers to Issues which sends a notification to them letting them know they have been assigned a task. You can also comment on issues with your progress on them.
Issues help to keep track of what needs doing in your projects, they can be used in conjunction with ‘Projects’ (more on this later) to create a Kanban style, Agile methodology. Follow the following instructions to create an Issue in your repository, assign yourself to it, and add labels:
- Go to your repository;
- On the navigation bar, click Issues;
- Click New Issue;
- Fill out the fields, including the title (what the task is) and a short description in the comment section;
- Once you are satisfied, click Submit new issue;
- You should now see the Issue, scroll down to Assignees and assign yourself or someone else to the issue;
- Click on Labels and then select one from the list or create your own using Edit labels;
- If you want to create your own label, click New label. Fill out the fields and click Create label;
- Go back to your Issue and then Labels and select the label you just created;
- You can also assign this Issue to a Project by clicking Projects if you have already created one.
Projects
Projects are often used in conjunction with Issues. It allows developers to sort issues and pull requests into a Kanban board, similar to software such as Trello. You can then plan and oversee your project, with issues and pull requests all being displayed for you to track your project. Follow these instructions to create a project and add the issue you just created to it:
- Go to your repository
- Click Projects then Create a project
- Fill in the fields, selecting a suitable title and description
- If you wish, select a Template, Automated kanban with reviews is great if you want to include some DevOps Automation
- Click Create project when you are satisfied. You should now see your project. You may have to click Fullscreen to see all cards
- Navigate back to the issue you created before
- Under Projects you should now see the project you created, click your project to add the issue to it. It will automatically be added to the ‘To do’ card
- Navigate back to your project to check if the issue has been added, you may add new columns if you wish
Milestones
Milestones are used in conjunction with issues and pull requests. When you create a milestone, you can associate it with issues and pull requests to track the progress of your project. From the milestone page, you can see:
- A user-provided description of the milestone, which can include a project overview, relevant teams, and projected due dates
- The milestone’s due date
- The milestone’s completion percentage
- The number and a list of open and closed issues and pull requests associated with the milestone
Follow these instructions to create a milestone:
- Go to your repository and select Issues;
- Click Milestones then New milestone;
- Fill in the fields and select a due date;
- Click Create milestone once you are satisfied;
- Navigate back to the issue you created previously, click it;
- Like before with labels and projects, click on Milestone;
- You should see your milestone, assign the issue to it.
If you have followed all steps to this point, you should now have an issue assigned to a Label, Project and Milestone. You can assign multiple issues to a Label, Project or Milestone. You should do this everytime you create an issue to greatly improve the organisation and tracking of your project.
Merging Strategy
It is important to employ a concrete merging strategy for your development lifecycle to go along with your workflow. This will result in fewer merging mistakes such as code being removed when it shouldn’t have been, code conflicts on both branches or code being merged when it shouldn’t have been.
To start with, a project lead or dedicated code reviewer should be chosen from your team. This developer will be responsible for reviewing the merge requests made by other developers on the feature and development branches. They will need to make sure no code is removed that shouldn’t be and any code added is appropriate and fully functional. They should first look at the code on the feature branches, check that they are ok with no errors or conflicts, then merge the changes with the development branch.
When you are wanting to push a new release version, the code reviewer will then need to test and review the development branch thoroughly. As the main branch is always live and ready to run, any changes to it should be made with caution, after a thorough code review and testing. When the reviewer/project lead is happy, the development branch may be merged with main, making sure to add a tag to show the new release version.
If you employ this strategy, less merging mistakes will be made, your repository will have a clear and clean structure and history, and the main branch will always be live and be able to be shown to stakeholders if needed. This strategy is similar to that employed by many software development companies and is an industry standard. Showing an interviewer a project with a clear workflow and merging strategy will be sure to impress. This merging strategy is similar to ‘Explicit Merging’ which can be seen in reference [4].
Hints on DevOps Automation
DevOps is a set of practices that combines software development with IT operations. Its main aim is to shorten the development cycle and provide continuous integration and delivery (CI/CD). It is complimentary with Agile software development, which you will become familiar with at Level 5. Automation is one of the key principles for accelerating development with DevOps, it is the addition of technology that performs tasks with reduced human assistance. You will become more familiar with DevOps and automation at Level 6, but it is useful to have knowledge of the basics at Level 5. Here are a few hints and helpful guidelines for basic DevOps automation:
- Choose open standards (maintain tooling that follows common, open standards)
- Use dynamic variables (prioritise reusable code, using externally defined variables to allow automation on different environments without needing to change the code)
- Use flexible tooling (using a DevOps tool that allows you to change technologies and reduce rework if a change of direction is needed)
- Use version control where possible
- Apply continuous monitoring (logging, monitoring, alerting, tracing)
These tips are based from reference [3].
Read about how you can set up automated DevOps with Github Actions.
Tools
Git is integrated in many development environments, including the ones that you will be using at Level 4. These include Visual Studio (Code) and IntelliJ IDEA. There are also a few Git GUI tools that are available to you, that may make it easier for you to use Git with your projects. Two of these we can recommend to you are:
- Github Desktop
- Git Kraken
We have prepared some walkthrough examples of how to integrate Git with the development environments above, as well as provided links to resources that can help you with VS Code, and the Git GUI tools in the IDE tools guidance. We encourage you to look at this guidance to help you integrate Git with all of your projects. This will help you build a portfolio of work, that you can show interviewers when applying for placements and graduate jobs after University.
If you want to learn more about how to run Git from the terminal, as well as in depth information and a visual walkthrough, this link is a great introduction to Git.
References
- [1] Hello World. Getting started with github - https://guides.github.com/activities/hello-world/
- [2] Gitflow. 5 types of Git workflows that will help you deliver a better code - https://buddy.works/blog/5-types-of-git-workflows
- [3] Github Blog. Getting started with DevOps automation - https://github.blog/2020-10-29-getting-started-with-devops-automation/
- [4] Atlassian. Git Merge Strategy Options and Examples - https://www.atlassian.com/git/tutorials/using-branches/merge-strategy
