Version Control IDE Tools
ℹ️Summary
Version control allows developers to keep track of their projects and have all files/folders/source code all in one place. It is particularly useful for teams of developers but is also useful for individual work.
Visual Studio
As you will be predominantly coding in C# at Level 4, Visual Studio will be the best IDE to use for creating and editing your code. It will be of great benefit to you to integrate Git with this IDE, and it is very easy to do so. I will now walk through how to integrate Git within Visual Studio.
How To Clone A Project
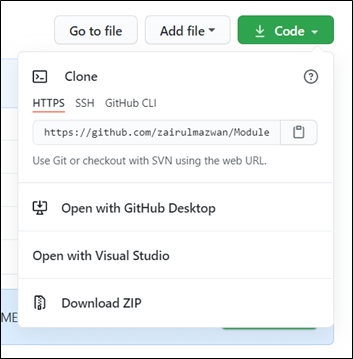
- Get the Github URL of the project that you wish to clone. From Github you can click the green Code button:
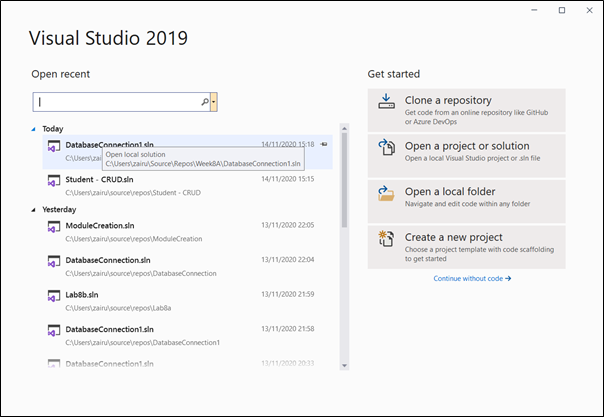
- Open Visual Studio. Select Clone a repository:
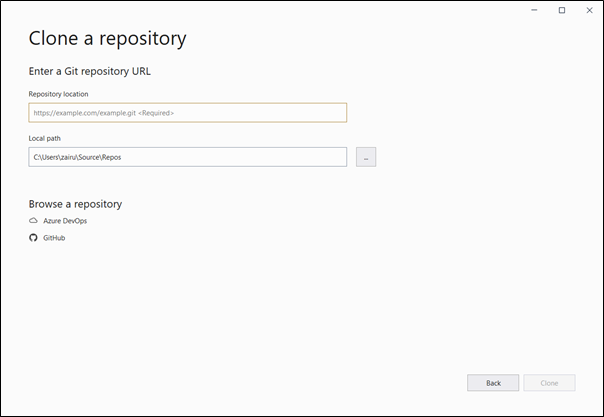
- Paste the URL in Repository Location
- Locate the path of the project to be saved on your computer
- Click the Clone button:
How To Push Your Project To Github
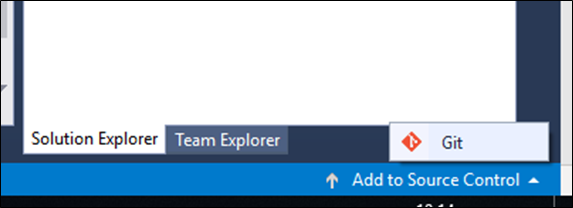
- From Visual Studio, go to the right bottom of the screen. You can see Add to Source Control. Select Git:
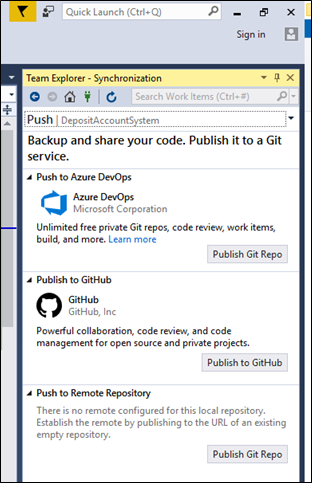
- This panel will be prompted. If there is no Team Explorer panel, go to View -> Team Explorer. Then select Publish to Github:
-
You might get a login window for Github if using Github on visual studio for the first time (or Github not connected), login if so.
-
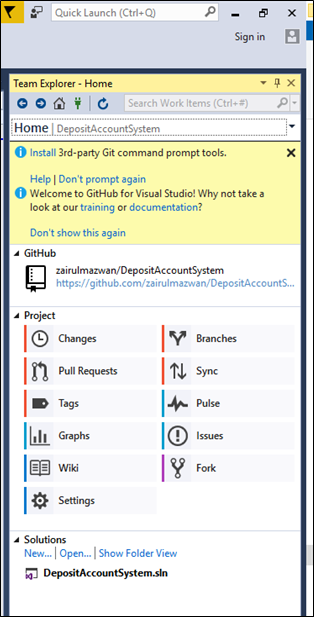
If there are changes made to the project, you need to update your project repository. Select Changes:
-
Input the message/hint of the changes and hit Commit All button, a dialog box will be prompted, select Yes.
-
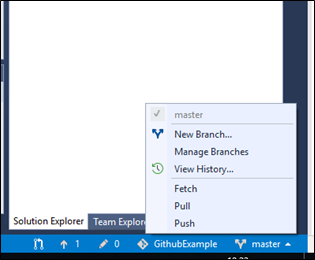
Now, you need to push the changes to Github. Select master from the right bottom of the screen, then Push:
- Login to you Github account, and check whether the changes have been updated to your repository.
IntelliJ IDEA
IntelliJ IDEA is the IDE we recommend for use with Java development, this IDE can also be integrated with Git. I will now walk you through how to set up Git with IntelliJ for use with your Java projects.
Enabling Version Control
In IntelliJ, you have to first enable version control. With a project open:
-
Choose Enable Version Control Integration from the VCS Operations Popup, or from the main VCS menu on the navbar at the top of your project.
-
In the Enable Version Control Integration dialog that opens, select a version control system from the list that you want to associate with your project root (Git).
-
After VCS integration is enabled, IntelliJ IDEA will ask you whether you want to share project settings files via VCS. You can choose Always Add to synchronize project settings with other repository users who work with IntelliJ IDEA.
Clone From An Existing Repository
-
From the main menu, select Git | Clone, or, if no project is currently opened, click Get from VCS on the Welcome screen.
-
In the Get from Version Control dialog, specify the URL of the remote repository you want to clone, or select one of the VCS hosting services on the left. If you are already logged in to the selected hosting service, completion will suggest the list of available repositories that you can clone:
 Fig.1: List of repositories. From reference [1]
-
Click Clone. If you want to create a project based on the sources you have cloned, click Yes in the confirmation dialog. Git root mapping will be automatically set to the project root directory. If your project contains submodules, they will also be cloned and automatically registered as project roots.
-
When you import or clone a project for the first time, IntelliJ IDEA analyzes it. If the IDE detects more than one configuration (for example, Eclipse and Gradle), it prompts you to select which configuration you want to use. Select the necessary configuration and click OK:
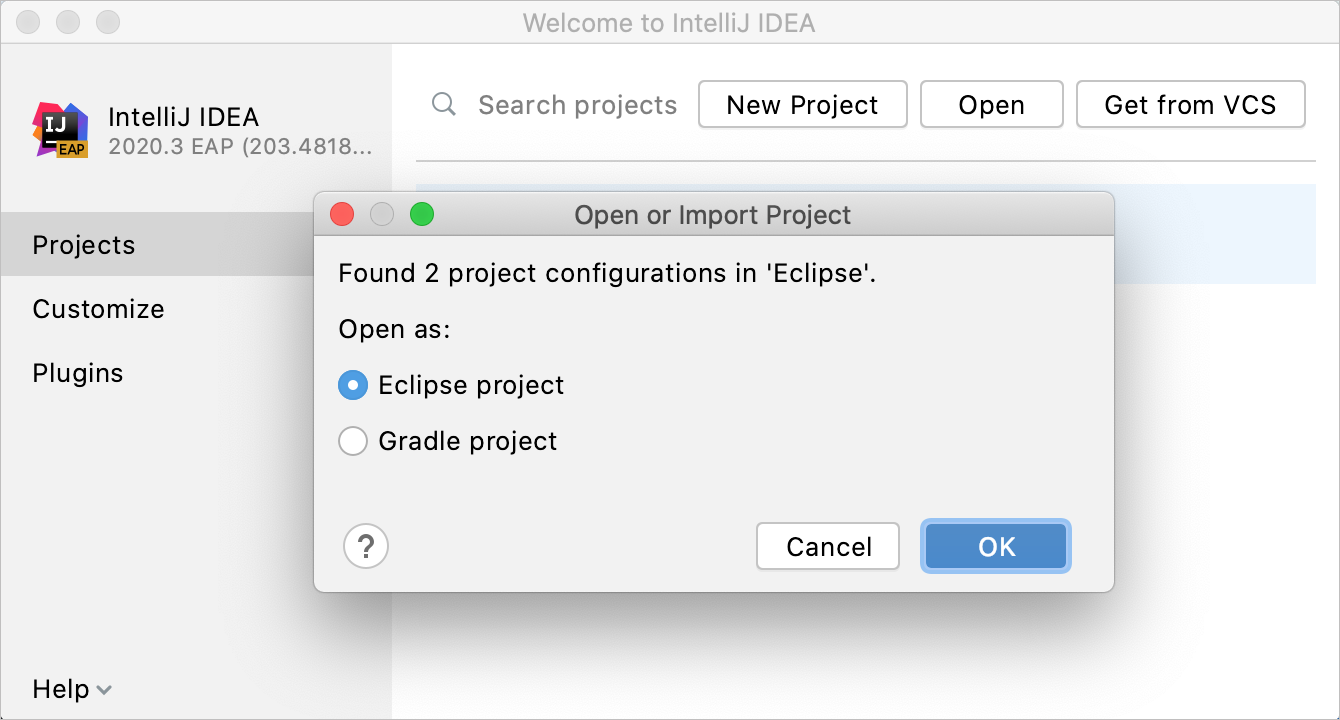 Fig.2: Check out a project from a remote host (clone). From reference [1]
Put An Existing Project Under Git
-
Open the project that you want to put under Git.
-
Choose Enable Version Control Integration from the VCS Operations Popup (Alt+) or from the main VCS menu.
-
Choose Git as the version control system and click OK.
-
After VCS integration is enabled, IntelliJ IDEA will ask you whether you want to share project settings files via VCS. You can choose Always Add to synchronize project settings with other repository users who work with IntelliJ IDEA.
Adding files to Git
Most changes that you may need to make to your repository can be managed within IntelliJ, under the Commit tool window (Alt+0). I will only demonstrate how to add files and commit changes, but deletion, and comparison status checking can all be done under this window.
-
In the Commit tool window (Alt+0), expand the Unversioned Files node.
-
Select the files you want to add to Git or the entire changelist and press Ctrl+Alt+A or choose Add to VCS from the context menu. You can also add files to your local Git repository from the Project tool window: select the files you want to add, and press Ctrl+Alt+A or choose Git | Add from the context menu.
Committing Changes
- Open the vertical Commit tool window (Alt+0) located on the left:
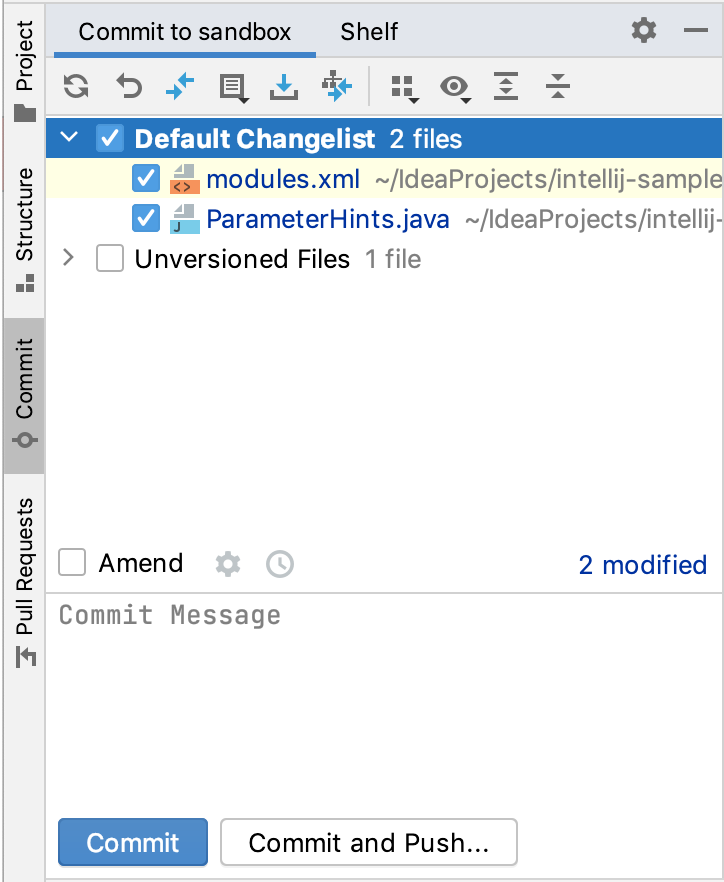 Fig.3: Commit changes locally. From reference [2]
-
As your changes are ready to be committed, select the corresponding files or an entire changelist. If you press Ctrl+K, the entire active changelist will be selected. You can also select files under the Unversioned Files node — IntelliJ IDEA will stage and commit these files in one step.
-
Enter the commit message. You can click Commit message history button to choose from the list of recent commit messages. You can also edit the commit message later before you’ve pushed the commit.
-
When you’re ready, click Commit or Commit and Push (Ctrl+Alt+K) to push the changes to the remote repository immediately after the commit. You will be able to review the current commit as well as all other commits before they are pushed to the remote.
Eclipse
Along with IntelliJ IDEA, Eclipse is also a great option for Java development. Similarly to the previous IDE’s, Eclipse can also be integrated with Github. I will now walkthrough an example of how to do this.
Push A Project To Github
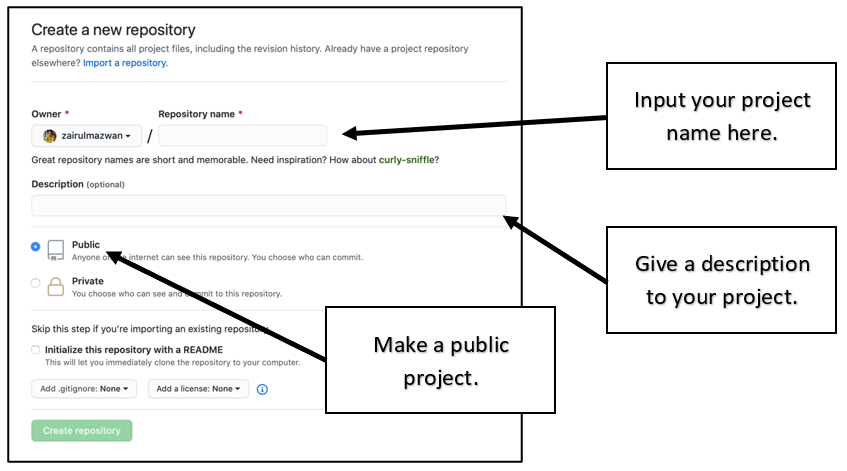
- Create a repository on Github:
- Copy the URL:

- Go into Eclipse, and find Perspectve from the top left:

Or search for Git Repositories in the search bar next to it. A panel should be added to the work space:

- Select this icon to clone the repository you created previously:
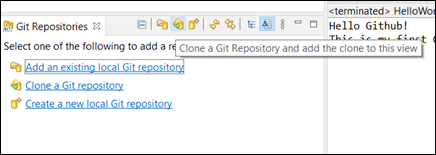
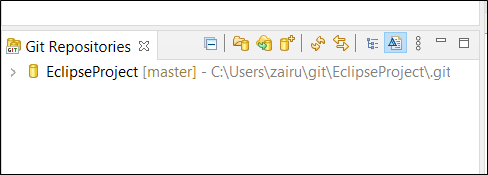
- Paste the URL of the repository you copied earlier, then click Next then Next again. Then finally, click Finish. A new repository should be created:
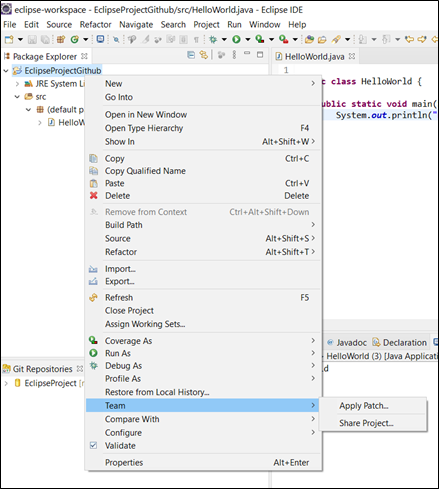
- Create a project in Eclipse. Then right click the project -> Team -> Share Project:
- Select the Github repository you just created:
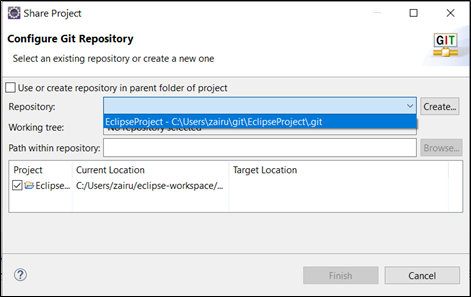
Then select Finish
Committing Changes
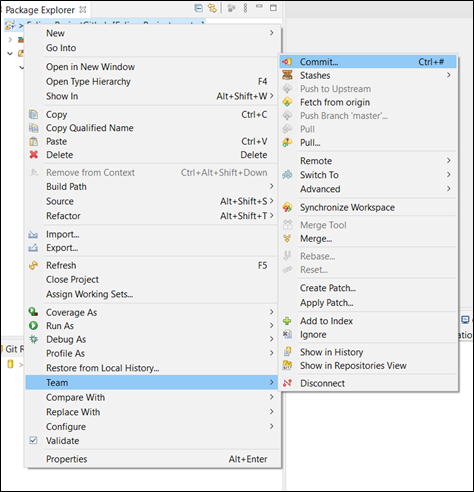
- Right click the project again, then Team -> Commit:
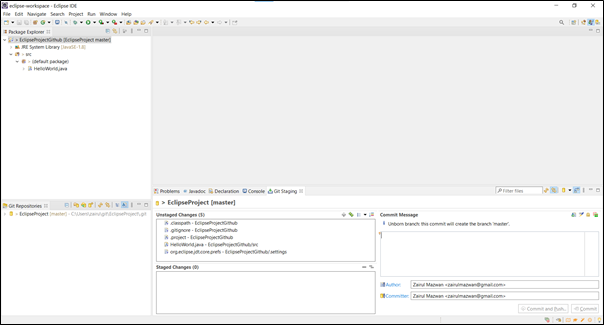
A new panel should appear at the bottom:
-
Select all the files in Unstaged then drag to the Stage Changes area. You can also click the + icon.
-
Create a message then select Commit and Push. Then select Preview,
-
Input your Github details and select Log in. Then, select Push and enter your details once again.
-
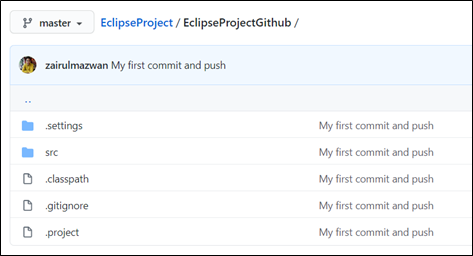
The changes should now be pushed, go ahead and click Close. Check your Github, the project source code should have been pushed:
Clone A Github Repository
-
From file, select Import
-
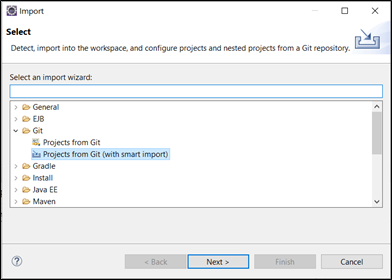
This panel should be prompted, select Git -> Project from Git (with smart import):
-
Select Clone URI, then copy in the Github URL (the project you wish to clone) and paste it in URI, then select Next, then Next again.
-
Name the new folder if the suggest name (from Github) is already existed in your directory, and click Next.
-
Select Finish:
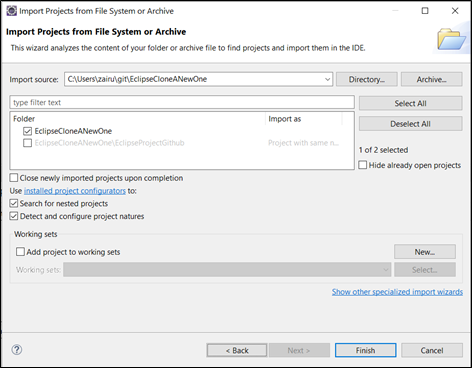
Your source code from Github should now be available in your Eclipse project.
Other Tools
If you are wanting to use other code editors or version control tools, the links below will help you set up Git with them:
VS Code
- Download/Link: https://code.visualstudio.com/
- How to integrate Git: https://code.visualstudio.com/docs/editor/versioncontrol
Github Desktop
- Download/Link: https://desktop.github.com/
- How to integrate Git: https://idratherbewriting.com/learnapidoc/pubapis_github_desktop_client.html
Git Kraken
- Download/Link: https://www.gitkraken.com/
- How to integrate Git: https://support.gitkraken.com/start-here/guide/
References
[1] JetBrains. Set up a Git repository. https://www.jetbrains.com/help/idea/set-up-a-git-repository.html
[2] JetBrains. Commit and push changes to Git repository. https://www.jetbrains.com/help/idea/commit-and-push-changes.html
