Testing - Level 5 #
1. Introduction#
Testing is a vital part of software development, and at Level 5, you will start to see this, more so than at Level 4. At this level, you will be exposed to 3 different types of software testing:
- Unit Testing
- Integration Testing
- User Acceptance Testing
2. Table of Contents#
- 1. Introduction
- 2. Table of Contents
- 3. Unit Testing
- 4. Integration Testing
- 5. User Acceptance Testing
- 6. Testing within the IDE
- 7. References
3. Unit Testing#
Unit Testing is a type of software testing where individual units or components of a software are tested. The purpose is to validate that each unit of the software code performs as expected. Unit Testing is done during the development (coding phase) of an application by the developers. Unit Tests isolate a section of code and verify its correctness. A unit may be an individual function, method, procedure, module, or object. At Level 5, the expectation is that you will do Unit Testing that makes use of a framework and is performed within the Integrated Development Environment (IDE). Manual testing and the concept of Unit Testing was covered in the Level 4 Testing document found here.
Later in this document, we will show you how to perform unit tests within both IntelliJ IDEA and Visual Studio 2019. In IntelliJ, we will be using the JUnit framework, which comes out of the box with the IDE, and in Visual Studio, we will be using MSTest, which also comes with the IDE. You can also use NUnit/xUnit.
4. Integration Testing#
Integration testing is defined as a type of testing where software modules are integrated logically and tested as a group. It is essentially similar to unit testing, but instead of testing just one module at a time (such as a functiion or object), it tests how multiple modules interact with each other. The purpose of this level of testing is to expose defects in the interaction between these software modules when they are integrated.
Integration Testing focuses on checking data communication amongst these modules. Hence it is also termed as 'I & T' (Integration and Testing), 'String Testing' and sometimes 'Thread Testing'.
4.1. Why do Integration Testing?#
Integration testing is important for a number of reasons:
- A Module, in general, is designed by an individual software developer whose understanding and programming logic may differ from other programmers. Integration Testing becomes necessary to verify the software modules work in unity.
- At the time of module development, there are wide chances of change in requirements by the clients. These new requirements may not be unit tested and hence system integration testing becomes necessary.
- Interfaces of the software modules with the database could be erroneous (incorrect).
- External Hardware interfaces, if any, could be erroneous.
- Inadequate exception handling could cause issues.
4.2. Test Cases#
As with unit testing, you are expected to write test cases for your integration testing. Integration test cases differ from other test cases in the sense it focuses mainly on the interfaces & flow of data/information between the modules. Here priority is to be given for the integrating links rather than the unit functions which should be already tested.
At Level 5, we are expecting manual integration testing, in a format similar to the following scenario, where this application has 3 modules 'Login Page', 'Mailbox' and 'Delete emails' and each of them is integrated logically:
| Test Case ID | Test Case Objective | Test Case Description | Expected Result | Actual Result |
|---|---|---|---|---|
| 1 | Check the interface link between the Login and Mailbox module | Enter login details and click on the Login button | To be directed to the Mailbox | Directed to the Mailbox |
| 2 | Check the interface link between the Mailbox and Delete Mails Module | From Mailbox select the email and click a delete button | Selected email should appear in the Deleted/Trash folder | Selected email appears in the Trash folder |
This is based from reference [6]. Visit this resource to find out more about integration testing.
4.3. Approaches#
There are many different approaches to integration testing:
- Big Bang Approach
- Incremental Approach: which is further divided into the following
- Top Down Approach
- Bottom Up Approach
- Sandwich Approach - Combination of Top Down and Bottom Up
Big Bang Testing#
Big Bang Testing is an Integration testing approach in which all the components or modules are integrated together at once and then tested as a unit. This combined set of components is considered as an entity while testing. If all of the components in the unit are not completed, the integration process will not execute.
Advantages:
- Convenient for small systems.
Disadvantages:
- Fault Localization is difficult.
- Given the sheer number of interfaces that need to be tested in this approach, some interfaces links to be tested could be missed easily.
- Since the Integration testing can commence only after "all" the modules are designed, the testing team will have less time for execution in the testing phase.
- Since all modules are tested at once, high-risk critical modules are not isolated and tested on priority. Peripheral modules which deal with user interfaces are also not isolated and tested on priority.
Incremental Testing#
In the Incremental Testing approach, testing is done by integrating two or more modules that are logically related to each other and then tested for proper functioning of the application. Then the other related modules are integrated incrementally and the process continues until all the logically related modules are integrated and tested successfully.
Incremental Approach, in turn, is carried out by two different Methods:
- Bottom-Up
- Top-Down
Bottom-Up#
Bottom-up Integration Testing is a strategy in which the lower level modules are tested first. These tested modules are then further used to facilitate the testing of higher level modules. The process continues until all modules at top level are tested. Once the lower level modules are tested and integrated, then the next level of modules are formed. The diagram below illustrates this:
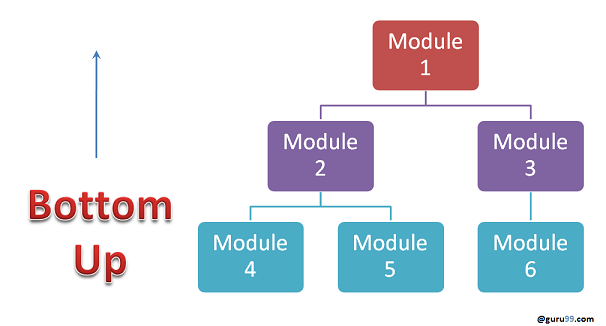
Fig. 1: Bottom-Up approach. Retrieved from reference [6].
Advantages:
- Fault localization is easier.
- No time is wasted waiting for all modules to be developed unlike Big-bang approach.
Disadvantages:
- Critical modules (at the top level of software architecture) which control the flow of application are tested last and may be prone to defects.
- An early prototype is not possible.
Top-Down#
Top Down Integration Testing is essentially the opposite of Bottom-Up. It is a method in which integration testing takes place from top to bottom following the control flow of software system. The higher level modules are tested first and then lower level modules are tested and integrated in order to check the software functionality. Stubs (dummy programs used to facilitate testing activity) are used for testing if some modules are not ready. The diagram below illustrates this:

Fig. 2: Top-Down approach. Retrieved from reference [6].
Advantages:
- Fault Localization is easier.
- Possibility to obtain an early prototype.
- Critical Modules are tested on priority; major design flaws could be found and fixed first.
Disadvantages:
- Needs many Stubs.
- Modules at a lower level are tested inadequately.
Sandwich Testing#
Sandwich Testing is a strategy in which top level modules are tested with lower level modules at the same time lower modules are integrated with top modules and tested as a system. It is a combination of Top-down and Bottom-up approaches therefore it is called 'Hybrid Integration Testing'. It makes use of both stubs as well as drivers:

Fig. 3: Sandwich approach. Retrieved from reference [6].
Stub: Is called by the Module under Test.
Driver: Calls the Module to be tested.
Again, integration testing at Level 5 should be manual. Evaluate your system and experiment with these approaches, choose the one you feel most effective with on your system. It would be nice to see some Continuous Integration (CI) depending on the module (such as group assigments or work with clients). You can see more information about CI in the Level 5 Delivery Guidelines.
5. User Acceptance Testing#
User Acceptance Testing (UAT), otherwise known as 'Beta', 'Application', or 'End-User Testing' is often the final phase of software testing. During UAT, actual users test the software you have developed to make sure it can handle required tasks in real-world scenarios, according to specifications (reference [7]). It can take many forms, such as a survey/questionnaire (completed by real users to gauge their opinions), or a more structured approach using test cases.
At Level 5, you will not always have access to users to perform UAT, but it might be nice to see depending on your module (such as group assigments or work with clients) if it is feasible. At Level 6, you will have to do some form of UAT, so it is useful to get to grips with it now.
The following diagram shows the process of UAT. It will be covered in more detail at Level 6:

Fig. 4: User Acceptance Testing process. Retrieved from reference [8].
6. Testing within the IDE#
6.1. Performing Tests in IntelliJ#
6.1.1. Preparing for Tests#
IntelliJ IDEA works with multiple testsing frameworks out of the box such as JUnit or TestNG. Inside the IDE you can create a test class directly from the source code together with the necessary testmethods. You can switch between test classes and source code with a shortcut, run multiple tests, view statistics for each test, and export test results for a file.
6.1.2. Create Tests#
The simplest way of creating a new test class in IntelliJ IDEA is by using a dedicated intention action that you can invoke from your source code. In this case, the IDE creates a new test class and generates test code for this class, package, or function.
1 - In your production code, place the caret at the class for which you want to create a test, press Alt+Enter, and select Create Test.
2 - In the Create Test dialog, select the library that you want to use. If you don't have the necessary library yet, you will be prompted to download it. To do that, click Fix.
If you're using Maven, the IDE will add the missing dependencies to your pom.xml.
For Gradle projects, add the necessary dependencies manually.
More information to add them manually here
3 - Configure the test class name and its location and select the methods that you want to test. Click OK.
As a result, IntelliJ IDEA creates a new test class with the specified name and generated test methods in the Test Sources Root.

6.2. Performing Tests in Visual Studio#
This section will explain how to perform unit tests in Visual Studio using the framework MSTest. More documentation on unit testing in Visual Studio and third party frameworks such as NUnit can be found here.
6.2.1 Creating Unit Tests#
1- Open the project that you want to test in Visual Studio. For the purposes of demonstrating an example unit test, we will test a simple "Hello World" C# project named HelloWorldCore. The sample code for such a project is as follows:
namespace HelloWorldCore

   public class Program
   {
      public static void Main()
      {
         Console.WriteLine("Hello World!");
      }
   }
2 - In Solution Explorer, select the solution node. Then, from the top menu bar, select File > Add > New Project.
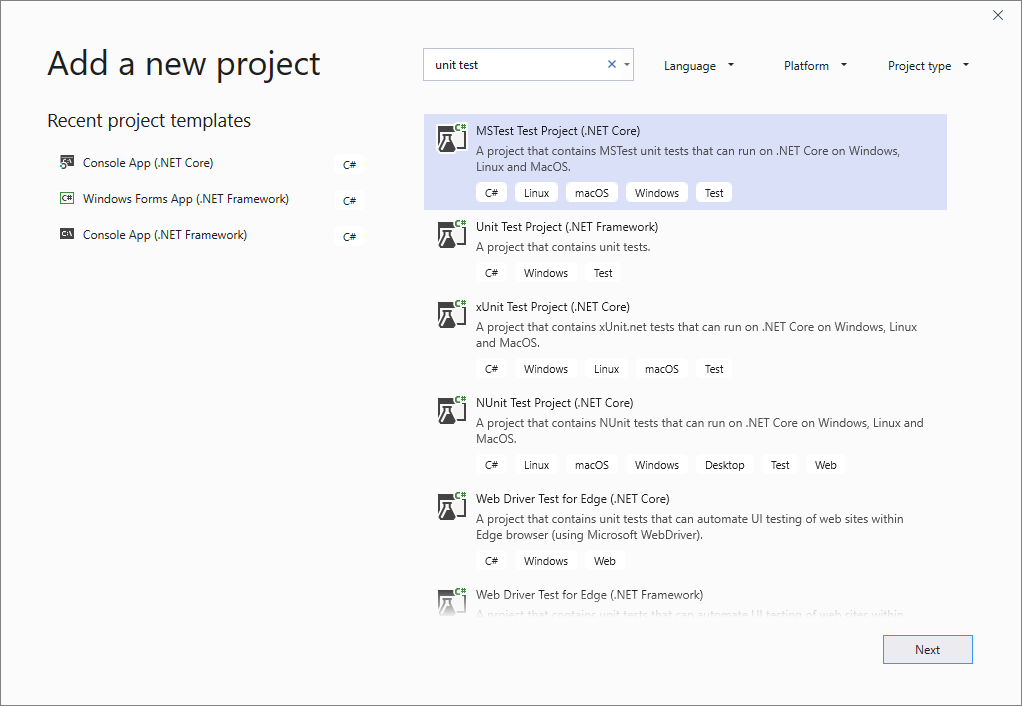
3 - In the new project dialog box, find a unit test project template for the test framework you want to use, such as MSTest, and select it.
For different languages such as C++, you will need to select a test framework supported by the language.
The following illustration shows an MSTest unit test, which is supported in .NET:
Cick Next, choose a name for the test project, and then click Create. The project is added to your solution:
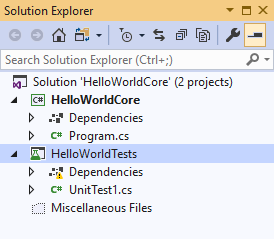
4 - In the unit test project, add a reference to the project you want to test by right-clicking on References or Dependencies and then choosing Add Reference.
5 - Select the project that contains the code you'll test and click OK:

6 - Add code to the unit test method. For example, you might use the following code:
using Microsoft.VisualStudio.TestTools.UnitTesting;
using System.IO;
using System;

namespace HelloWorldTests
{
   [TestClass]
   public class UnitTest1
   {
      private const string Expected = "Hello World!";
      [TestMethod]
      public void TestMethod1()
      {
         using (var sw = new StringWriter())
         {
            Console.SetOut(sw);
            HelloWorldCore.Program.Main();

            var result = sw.ToString().Trim();
            Assert.AreEqual(Expected, result);
         }
      }
   }
}
6.2.2 Running Unit Tests#
1 - Open Test Explorer.
To open Test Explorer, choose Test > Test Explorer from the top menu bar (or press Ctrl + E, T).
2 - Run your unit tests by clicking Run All (or press Ctrl + R, V):
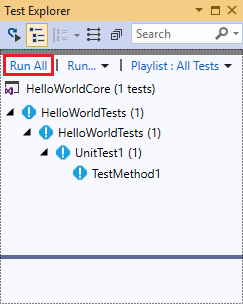
After the tests have completed, a green check mark indicates that a test passed. A red "x" icon indicates that a test failed:

More documentation on MSTest can be found here.
7. References#
[1] Guru99. Unit Testing Tutorial. https://www.guru99.com/unit-testing-guide.html
[2] DZone Unit Testing Guidelines. What to Test and What Not To Test https://dzone.com/articles/unit-testing-guidelines-what-to-test-and-what-not
[3] Guru99. Automated Testing vs Manual Testing https://www.guru99.com/difference-automated-vs-manual-testing.html
[4] JetBrains. IntelliJ IDEA Testing. https://www.jetbrains.com/help/idea/testing.html
[5] TutorialsPoint. IntelliJ Idea - Unit Testing. https://www.tutorialspoint.com/intellij_idea/intellij_idea_unit_testing.htm
[6] Guru99. Integration Testing: What is, Types, Top Down & Bottom Up Example. https://www.guru99.com/integration-testing.html
[7] Techopedia. User Acceptance Testing (UAT). https://www.techopedia.com/definition/3887/user-acceptance-testing-uat-software-testing
[8] Guru99. What is User Acceptance Testing (UAT)? with Examples. https://www.guru99.com/user-acceptance-testing.html